IASUS CONCEPTS
Troubleshooting & Setup Support
Welcome to the IASUS Troubleshooting & Setup Support page. Here you’ll find step-by-step guidance, setup tips, and solutions for common issues with your IASUS products, including throat microphones, helmet communication systems, amplifiers, and wireless PTT devices.
Whether you are a rider, industrial user, or training professional, these resources will help you get back to clear, reliable communication quickly and safely.
Getting Started
Before troubleshooting, ensure your system is correctly set up:
- Fully charge or power your device.
- Confirm all cables and connectors are secure.
- Verify compatibility with your helmet, PPE, or radio.
- Turn on devices according to the user guide.
- Test audio levels before mounting or wearing devices.
Following these steps resolves the majority of setup issues.
XSound Helmet Speakers Troubleshooting
Installation guide video.
How do I properly install the XSound helmet speakers for best sound?
For the best audio performance, XSound helmet speakers should sit flush against your ears when worn inside your helmet. For XS3 models, use the included foam spacing pads to achieve proper placement.

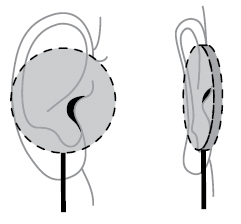
Position the speakers slightly forward and lower in the helmet ear pockets to ensure a comfortable fit and optimal sound delivery.
Incorrect placement can reduce audio quality and may damage the speakers over time, often caused by increasing the volume to compensate for gaps that let wind or engine noise interfere. Proper positioning ensures clear sound at safe volume levels.
Test Before Mounting

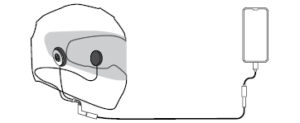
Before installing the speakers in your helmet, connect them directly to a smartphone or music player using the 3.5mm cable. Hold the speakers against your ears while playing audio to determine the optimal placement. This ensures the best sound quality before final installation in your helmet.
My helmet speakers fit too tightly.
Some helmet brands feature a tighter interior that may not comfortably fit IASUS speakers. Before purchase, ensure your helmet can accommodate the additional ½ inch on each side required for proper speaker placement.
Music Crackles or Pops When Used with a Motorcycle Headset or Bluetooth Receiver
If you notice crackling or popping when using your XSound helmet speakers with a motorcycle headset or Bluetooth receiver, they are not necessarily defective.
To check, connect the speakers directly to a smartphone or music player using the 3.5mm cable at the same volume. If the audio plays cleanly, the headset or Bluetooth receiver is likely the cause. Many receivers do not support low-frequency outputs, as their stock speakers are not designed for full-range audio.
The XSound series is tested to handle maximum volume on smartphones and music players without distortion. However, listening at excessively high volumes can cause temporary or permanent hearing damage, so please use caution.
Due to varying headset and Bluetooth receiver designs, IASUS cannot guarantee compatibility with every model, though the XSound speakers are engineered to be a high-quality replacement for stock headset speakers.
Audio Plays at Low Volume or Lacks Bass
If your XSound helmet speakers sound thin, overly treble-heavy, or too quiet, adjust the foam pads to ensure the speakers sit flush against your ears, just as you held them when testing audio before installation. Proper placement ensures full-range sound and optimal volume.
The helmet speaker/ear adjustment tab.

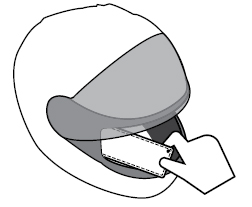
For tight-fitting helmets, volume and sound quality may be reduced if your ears are pressed or folded after putting on the helmet, as this blocks the audio path. To address this, the XSound 3/4 includes a thin adjustment tab that allows you to position your ears correctly, either through the visor opening or from the bottom of the helmet.
For optimal sound, ensure the speakers sit flush against your ears. Misalignment of helmet ear cavities can also affect audio performance, so we recommend testing the speakers on your ears before installation to benchmark volume and sound quality.
The package also includes a key ring for the adjustment tab, making it easy to keep with you while riding.
Are the cables on my XSound speakers faulty?
XSound speaker cables are designed to meet RoHS compliance and environmental standards, which means they are made from biodegradable materials. Over time, this can cause the cables to naturally degrade. This is normal for all wired headsets, including those from other major brands like Bose and Sony, and does not indicate a manufacturing defect.
NT5, NT3-R, GP3-R and Sniper Pro II Troubleshooting
Before using your NT3-R/GP3-R/NT5 throat mic system.
- Connect the mic cable to your device’s audio input (2-way radio, mobile phone, Xbox, computer).
- Insert the contour-molded earpiece so it sits comfortably and securely in your ear.
- Use the PTT (push-to-talk) button to speak, clipping it wherever is most convenient.
- Adjust the throat strap and transponder to find your personal “sweet spot.” This varies depending on anatomy, voice quality, and facial hair.
– Moving the transponder closer to the center of your throat increases volume but may cause distortion.
– Moving it slightly away can reduce muffling and improve clarity. - Secure the strap once you find the optimal balance of volume and clarity.
Proper adjustment ensures clear, reliable communication under all conditions.
How the NT3-R / GP3-R / NT5 Works
IASUS Noise Terminator (NT) throat microphones work differently from conventional headsets. Traditional boom mics rely on acoustic induction from sound waves in the air, which often captures background noise.
By contrast, NT3-R, GP3-R, and NT5 mics pick up voice vibrations directly from the larynx via a single aluminum transponder positioned just off the center of the throat. This design naturally eliminates background noise, making the system ideal for noisy environments and covert communication.
Many throat mics use a double-transponder setup, placing one on each side of the throat. This can cause distortion because most people’s necks are not perfectly symmetrical. IASUS solves this with a single-transponder design, positioned 1–2 inches from the throat’s center to hit the optimal “sweet spot” for clarity and volume.
How can I avoid audio hazards and hearing damage?
In noisy environments such as clubs, concerts, or on motorcycles, always use the NT5 system’s acoustic coil earpiece with an earplug. This allows your brain to register the audio clearly without raising the volume to unsafe levels.
Without proper protection, the NT5 requires the audio source to be louder than surrounding noise, which can increase the risk of temporary or permanent hearing damage.
If you prefer not to use the acoustic coil earpiece, the NT5 system is also compatible with optional earbuds or helmet speakers, providing flexible listening options while maintaining clarity and safety.
What Phones or Two-Way Radios Are the NT3-R/GP3-R/NT5 Compatible With?
The NT5 system is compatible with most popular mobile phones and two-way radio models. For detailed information on required adapters and specific compatible devices, please refer to our full compatibility table.
For optimal performance, pair your NT5 throat mic with higher-end or higher-powered UHF radios. Lower-end radios may not meet the performance specifications of the NT5, which could affect clarity and transmission quality.
How to optimize communication using a throat mic?
Unlike traditional mics, throat mic transponders have a tendency to sound “muffled” (sounds like you have a cold) because nasal sounds do not get transferred through vibrations in the neck. The IASUS throat mics through three generations of development are the most refined on the market today. When used properly they deliver the clearest communication under extreme environmental conditions such as wind and noise.
When using the throat mic, it is important to speak clearly and to maintain a normal audible tone (speak as if you are talking in an ambient room). This is not inherently natural, as we tend to speak louder when the environment is noisy or windy but this technique will optimize the sound quality of our transponder communication.
The sound quality coming from my transponder isn't very good. What's wrong?
Usually this is simply a matter of finding the ideal location for the transponder on your throat. Everybody has a “sweet spot” that balances volume and clarity, and it is generally found about 1 to 2 inches from the center of your throat. However, its location is different for everyone and depends on factors such as your individual anatomy, voice quality, and amount of facial hair. Moving the transponder closer to your voice box (at the center of your throat) will boost the volume, but may cause distortion. If the sound quality is muffled, move the transponder further away from the center of your throat. You should keep readjusting the throat strap and testing the unit until you find the sweet spot.
Another potential cause of poor sound quality is the device you are using to transmit the signal. Better audio sources—such as higher-end radios—result in better communication. We recommend pairing our headsets with higher-powered UHF radios. Certain low-end recreational radios are not up to the performance specifications of our throat mics and can interfere with their performance.
When using the single earpiece in a noisy environment, I still cannot hear clearly. How can I fix this?
In particularly noisy environments such as inside clubs, at concerts, or while under heavy fire, pairing the NT 3 system’s earpiece with an earplug is a MUST. This is because in order to register sound, the brain processes the dominant sound level from either the left or right ear. That means that when using the NT3-R in a loud environment, the volume of the audio source needs to be louder than the external noise in order for your brain to “hear,” resulting in potential loss of hearing in high volume situations. Plugging the open ear prevents this sensory imbalance.
Why doesn't my phone's voice activation function work with the noise terminator throat mic?
IASUS Noise Terminator Throat Mic systems work quite well with the voice activation (VOX) functions of many cellular phones. However, users must first re-record the voice tag using their throat mic. The phone’s software will not match the user’s voice when using the Noise Terminator with a tag recorded under normal conditions. Also, remember to wait for the signal from the phone first before speaking to activate the voice tag.
There is a very loud beep sound when I use the NT3-R/GP3-R with my FRS radio. How can I get rid of this?
Pressing the CE+ button when you turn on your FRS will remove this loud sound.
My radio continually transmits when I plug in my headset. What's wrong?
You need to make sure the radio is powered-off when you plug in the headset. The headset should function normally after the radio is powered on again.
My radio will not charge.
Please make sure that the radio is positioned correctly on the charger so that all four contacts are lined up with the charging rails.
BMH Helmet Communication Troubleshooting
Audio is Distorted or Crackling
- Ensure the speakers are flush against your ears inside the helmet.
- Verify the helmet ear pockets are not obstructing the speakers.
- Check the volume levels on both the BMH system and connected device.
- Test the system with a direct audio source (smartphone or music player) to isolate whether the issue is with the BMH or the connected device.
Low Volume or Reduced Clarity
- Adjust the speaker placement within the helmet for optimal contact with your ears.
- Tight-fitting helmets can reduce audio performance; use any included adjustment tabs or foam pads to position the speakers correctly.
- Ensure the battery is fully charged, as low power can affect volume and clarity.
Bluetooth Pairing Issues
- Make sure the BMH system is in pairing mode.
- Verify the device is within Bluetooth range.
- Remove previous pairings and re-pair devices if the connection is unstable.
- Restart both the BMH system and the paired device if necessary.
Charging Issues
- Ensure the USB-C cable is fully inserted into both the BMH system and the power source.
- Try a different USB-C port or power adapter to rule out compatibility issues.
- Verify the power source is active and providing sufficient output.
- If the system still does not charge, allow a few minutes for the battery to register before attempting again.
Maintenance Tips
- Keep the speakers and microphone clean and dry.
- Regularly inspect cables, connectors, and mounting points.
- Avoid extreme temperatures or moisture, which may affect performance.
